Many developers work at companies that employ a proxy to control access to The Internet. This can get annoying because many software development tools either outright don't support the use of a proxy or need special configuration to be able to get through the proxy. Open-source and cross-platform tools in particular rarely have the same integrated access capabilities as commercial development tools; this may mean developers have to have the knowledge needed to configure their development environments to co-exist with the corporate proxy.
I've always found it to be the case that most developers don't have the knowledge needed to work cohesively with the corporate proxy. When working for a past employer, for example, the primary interface with our SaaS services was a SOAP web service. Our customers with developers using Java would always have problems trying to consume our WSDL when the Java bindings would attempt to download WS-I and other dependency schemas needed to form the web service client's data objects. Trying to explain to a customer's developers how to allow Java to reach through their corporate proxy without any knowledge of the customer's network topology was a bit difficult.
IT support organizations also don't tend to understand how to support developers in configuring their tools to get around the proxy. If IT desktop support can browse a destination URL in a web browser, it might be difficult for the support analyst to understand the problem. Developers that use Microsoft Windows tools (MS Visual Studio, Windows OS, Windows Server infrastructure, etc) don't run into problems since the proxy access is completely integrated. When technology changes dictate the use of new varieties of tools (such as Docker) is where the problems begin.
Standard Caveat: This should work for most people behind a corporate proxy, but there are always exceptions. Networking technology is moving towards the direction of software defined networks where rules are enforced by smart firewalls instead of proxies. If your company is controlling access to The Internet using tools other than a proxy, your mileage may vary. 😃
Finding the Proxy Server
To work with the proxy server, you first must know the name of the proxy server. If the name of the proxy server is unknown, you can ask your IT group or attempt to discover it using Proxy Auto Config. This means you can paste (or click) the URL http://wpad or http://wpad.{your corporate domain} to trigger the download of the JavaScript that implements the proxy server resolution logic.
From this code, you can search for proxy entries similar to the following:
PROXY {fully qualified domain name}:{port}
With the FQDN and port, you can create the proxy URI:
http://{username}:{password}@{FQDN}:{port}/
Of course, you need to encode special characters in the username and password. If you're authenticating to a Windows domain, for example, your proxy URI might look like this:
http://{domain}%5C{username}:{password}@{FQDN}:{port}/
Configuring Docker
Docker itself needs the proxy configuration to download base images when required. In the Docker settings, paste the proxy URI in the "Web Server" field under the "Proxies" settings.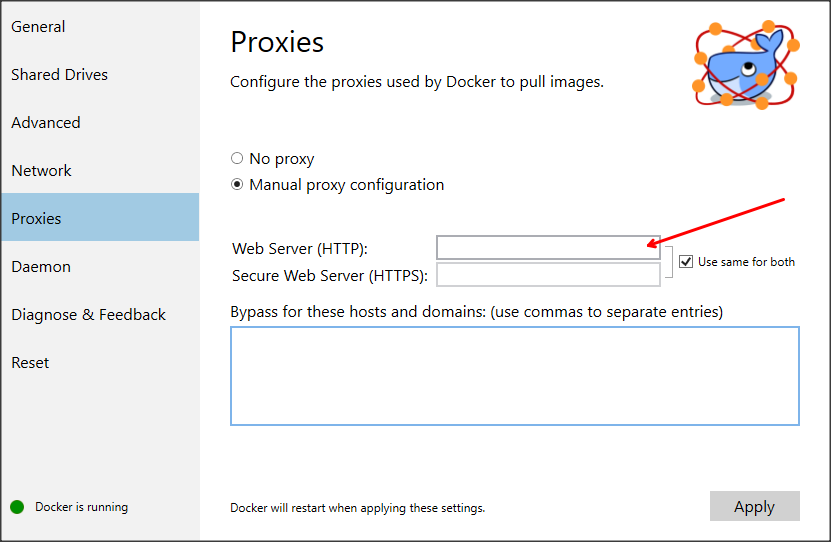
This will allow base images to be downloaded from the public Docker repository through the proxy. This will not allow your images to build if you are installing additional packages (i.e. deb/rpm, pip, etc) as part of your image build. The configuration of Visual Studio Code is required to allow your image builds to download additional packages.
Configuring Visual Studio Code
Visual Studio Code's settings, by default, does not use a proxy server. A small bit of configuration is required to make VSCode "proxy aware."
In VSCode, navigate to "File->Preferences->Settings" to view the settings editor. Configure the proxy by overriding the "http.proxy" setting under "User Settings." This configuration setting will also be used to create a new build definition that will propagate the proxy settings to the Docker image during build. (As a side effect, VSCode can now to retrieve updates and install plugins while behind the proxy.)

Configuring the Build Task for the Docker Project
The final step is to configure a build task for your Docker project. This requires a ".vscode/tasks.json" file to be created. This can be done by navigating to "Tasks->Configure Tasks" and selecting "Create tasks.json file from template" when prompted.
The following task configuration can be pasted into the tasks.json file:
{
    "version": "2.0.0",
    "tasks": [
        {
            "label": "Docker Build",
            "type": "shell",
            "command": "docker",
            "args" : [
                "build",
                "--build-arg",
                "HTTP_PROXY=${config:http.proxy}",
                "--build-arg",
                "HTTPS_PROXY=${config:http.proxy}",
                "--build-arg",
                "http_proxy=${config:http.proxy}",
                "--build-arg",
                "https_proxy=${config:http.proxy}",
                "-t",
                "${workspaceFolderBasename}:latest",
                "${workspaceFolder}"
            ],
            "group": "build",
            "presentation": {
                "echo": true,
                "reveal": "always",
                "focus": true,
                "panel": "shared"
            },
            "problemMatcher": [],
        }
    ]
}
Once this task configuration has been saved in tasks.json, the Ctrl-Shift-B key command will show "Docker Build" as an option.
How the Task Works
The task configuration uses the VSCode configured http.proxy value configured in the previous section to pass the proxy URI as pre-defined ARG values for HTTP/HTTPS proxy settings. The reason we use ARG instead of ENV is that ARG values are not persisted in the final image. The proxy URI may contain your username and password, it is therefore unwise to allow it to be persisted in a Docker image that might be shared in a common repository.
No comments:
Post a Comment